5-Minute Primer
NHRA is not your typical racing game. There are no corners to drift around, no opponents to bump off the track, and no long laps to make up for a bad start. It is a pure, distilled simulation of straight-line drag racing, governed by the strict rules and regulations of the National Hot Rod Association. If you are coming from games like Forza or Gran Turismo, you need to completely rewire your brain. Here is everything you need to know in five minutes.
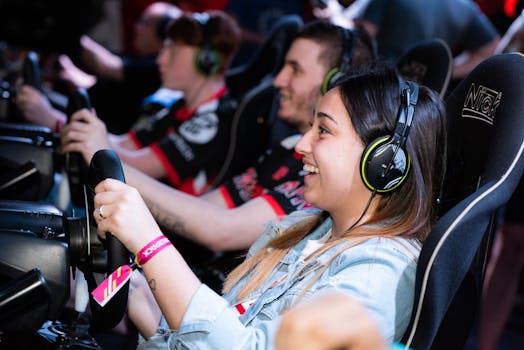
First, a drag race is won or lost at the starting line. Your actual elapsed time (E.T.) down the quarter-mile matters, but it is secondary to your Reaction Time. If you leave the line a fraction of a second before the green light illuminates, you "redlight" and instantly lose, regardless of how fast your car is. Second, your job as the driver is limited to three actions: staging the car, launching it, and shifting. The computer handles the steering, because you are going in a perfectly straight line. Third, you are managing extreme horsepower. Top-tier cars in this game produce over 11,000 horsepower. If you mash the throttle too early or too hard, you will obliterate the rear tires, spin wildly, and lose the race. Control is everything.
The game is divided into two main pillars: Career Mode and Online Multiplayer. Career Mode tasks you with building a racing team from the ground up, starting in lower-tier classes like Top Sportsman or Funny Car before working your way up to the pinnacle of the sport: Top Fuel. You will manage budgets, sign sponsors, hire crew chiefs, and slowly upgrade your car. Multiplayer pits you against other players in highly competitive, bracket-style tournaments where the matchmaking is heavily reliant on your consistency rather than just raw speed. To succeed in NHRA, you must learn patience, develop muscle memory for the timing of the "Christmas Tree" (the starting lights), and understand that a perfect pass is a symphony of small, precise inputs rather than a single dramatic maneuver.
First Hour Checklist
When you first boot up the game, the sheer number of menus, sliders, and garage options can be overwhelming. Treat your first hour as an orientation period. Do not worry about winning championships yet. Focus entirely on establishing a functional baseline for your team and understanding the flow of a race weekend.
- Complete the Tutorial Thoroughly: Do not skip a single step. The tutorial is the only place the game explicitly explains the staging process, which is notoriously confusing for beginners. Pay close attention to the difference between the "Pre-Stage" and "Stage" bulbs.
- Learn the Christmas Tree: Spend fifteen minutes in free play just looking at the starting lights. There are two types of trees in NHRA: the Sportsman Tree (which has a delay after the last amber light) and the Pro Tree (where all three ambers light up at once, followed instantly by green). Learn to anticipate the Pro Tree.
- Dial In Your Basic Controls: Figure out whether you prefer using a controller trigger for the throttle or a button. For shifting, decide if you want to use the face buttons or the bumpers. Consistency is key, so pick a layout and stick to it before muscle memory sets in incorrectly.
- Make Your First Passes Without Shifting: In your first few practice runs, leave the car in automatic or simply do not shift. Focus 100% of your attention on the launch. Get a feel for how much throttle the tires can take before breaking traction.
- Navigate the Garage Menu: Go into the garage and look at the upgrade tree. You do not need to buy anything yet, but understand where the engine, suspension, body, and drivetrain upgrades are located.
- Sign Your First Sponsor: In career mode, look at the sponsorship offers. Pick a sponsor that offers a good balance of upfront cash and per-race bonuses. Do not worry about long-term contracts in your first hour; just get some steady income flowing.
Key Systems Explained
The Staging System
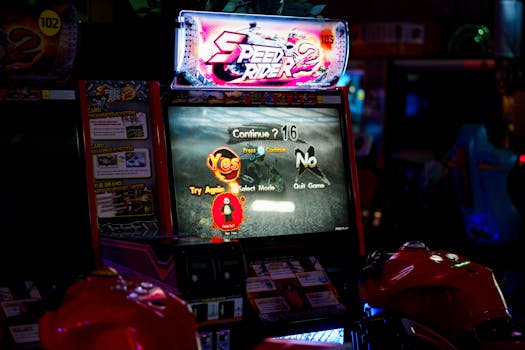
Before you can race, you must stage. When you approach the line, you will see two sets of white bulbs on the Christmas Tree. Rolling forward slowly will light the top set, known as the Pre-Stage bulbs. Once you pre-stage, rolling forward just a few more inches will light the second set, the Stage bulbs. At this point, you are officially on the starting line.
Here is the crucial beginner trap: if you roll forward too far and turn off the pre-stage bulbs, you will trigger a red light and be disqualified. Once both sets of bulbs are lit, you must bring your car to a complete, absolute stop. Furthermore, pay attention to your opponent. Some veterans use a tactic called "deep staging," where they roll in slightly further to get a closer start. You do not need to do this as a beginner, but you need to know why the other car might be rolling forward after staging. Once both cars are staged, the starter will activate the tree.
The Economy and Sponsorship
NHRA features a surprisingly deep economic system. You are not just a driver; you are a team owner. Every single pass you make costs money. You pay for tires, which degrade rapidly. You pay for engine parts, which can explode if you push too much boost without the right upgrades. You pay for crew salaries and travel expenses to different tracks across the country.
To offset these costs, you have sponsors. Sponsorships in NHRA generally come with specific requirements. A sponsor might give you a large sum of money upfront, but require you to finish in the top three of a race weekend to unlock the rest of the payout. Others might offer smaller, guaranteed payouts per round you win. As a beginner, prioritize guaranteed income over high-risk, high-reward contracts. You need a financial safety net to survive the early game when you are inevitably losing races due to driver error.
Crew Chiefs and Tuning
You do not tune the car yourself in a highly detailed, granular way; you delegate that to your Crew Chief. However, you tell the Crew Chief what to do. Before a pass, you can adjust variables like tire pressure, clutch lock-up timing, fuel mixture, and blower overdrive (for forced induction cars).
Your Crew Chief has a rating. A low-rated chief will give you vague, sometimes unhelpful feedback after a run, like "The car felt slow." A high-rated chief will tell you exactly what happened: "You spun the tires at the 60-foot mark because the clutch locked up too early." Investing your early-game funds into hiring a better Crew Chief is often more impactful than buying a slightly better intake manifold. The chief will also provide baseline setups for different track conditions, which removes a massive burden of guesswork from your shoulders.
Weather and Track Conditions
Drag racing is heavily dependent on the environment. The game dynamically simulates weather, track temperature, air density, and humidity. Cold, dense air produces more horsepower, but if the track is cold, the tires will not stick. Hot weather makes the track sticky (good for traction) but reduces engine power (bad for speed). Before every run, check the atmospheric conditions. If the track is slick, you need to tell your Crew Chief to reduce power or adjust the clutch to slip more, allowing the tires to hook up. Ignoring the weather is a guaranteed way to lose consistently.
Build / Character Choices
Choosing Your Starting Class
When you start your Career Mode, you will be faced with a choice of which class of car to campaign. The game generally offers entry points into categories like Top Sportsman (door cars like Pro Modifieds), Funny Car, and Top Fuel. For a beginner, you should absolutely choose a door car class like Top Sportsman or Pro Stock.
Why? Top Fuel and Funny Cars are inherently evil to drive. They produce so much horsepower that the line between a perfect launch and a tire-smoking disaster is razor-thin. They require millimeter-perfect throttle control and shifting that is timed down to the millisecond. Door cars, on the other hand, have significantly less power, wider, more forgiving tires, and a powerband that is much easier to manage. You will learn the fundamentals of staging, shifting, and reading the track without getting frustrated by cars that are actively trying to kill you. Once you master a door car, you can sell it and transition to the nitro-burning classes with a solid foundation of skill.
Upgrade Prioritization
When you look at the upgrade menu, do not be tempted by the shiny, expensive engine blocks right away. If your car cannot put the power to the ground, more power is completely useless. Follow this specific upgrade path for maximum efficiency:
- Tires First: Better tires offer more grip. More grip means you can launch harder without spinning. This is the single most important upgrade in the early game.
- Suspension Second: Upgraded shocks and struts help transfer weight to the rear tires on launch, further improving traction. It also keeps the car stable at high speeds.
- Drivetrain Third: A better clutch and transmission allow for cleaner, faster shifts. Missed shifts or slow shifts cost precious milliseconds.
- Engine Last: Only after the car is hooking up perfectly and shifting cleanly should you start adding horsepower. When you do add engine parts, focus on reliability upgrades before maximum power upgrades.
Driver Perks
As you progress, you will earn perk points to assign to your driver. Do not spread these points out evenly. Specialize heavily. Put all of your early points into the Reaction Time tree. As established, the race is won at the tree. A car that is 10 miles per hour slower but leaves the line three hundredths of a second sooner will usually win. Once your reaction times are consistently in the low .020s to .040s, start branching out into car control and shifting speed perks.
Pitfalls to Dodge
New players to NHRA consistently fall into the exact same traps. The learning curve in drag racing is unique, and unlearning bad habits takes longer than learning good ones. Memorize these common mistakes and actively work to avoid them during your first few play sessions.
1. The Early Redlight
The urge to guess the green light is overwhelming. You sit there, revving, waiting, and you think, "If I go now, I'll get a head start." Do not do this. In real life and in the game, if your front tires leave the staging beam before the green light comes on, you redlight. A .001 redlight (leaving one thousandth of a second too early) still loses the race against a .500 reaction time (the absolute worst legal reaction time). Wait for the light. A perfectly consistent .050 reaction time will win you more races than occasionally guessing a .010 and occasionally redlighting.
2. Mashing the Throttle
This is not a street race. If you slam the throttle from zero to one hundred percent the instant the green light glows, your rear tires will turn into blazing smoke. You need to "roll into" the throttle. Depending on the car and track conditions, this might mean pushing the throttle to 60% instantly, waiting a fraction of a second for the car to hook up, and then smoothly applying the remaining 40% over the next second. Treat the trigger like a delicate dial, not an on/off switch.
3. Ignoring the Burnout Box
Before every pass, you are allowed to do a burnout to heat up your rear tires. Hot rubber is sticky rubber. Do not just drive through the water box and stage. Stop in the water, spin the tires to get them wet, then roll forward out of the water and do a proper, smoky burnout. If you do a burnout in the water, you will trap water inside the tread, which will cause you to spin on the starting line. Learn the proper procedure: water, spin, roll out, then burnout.
4. Power Over Grip
Beginners look at the engine upgrade menu, see a part that adds 150 horsepower, and spend all their money on it. Then they go to the track, mash the gas, and instantly lose because the car has too much power for the tires. Always prioritize grip, suspension, and chassis tuning over raw horsepower. A 1,500-horsepower car that hooks up will beat a 2,000-horsepower car that is spinning its tires for the first 300 feet every single time.
5. Shifting Blindly
Do not just shift when the car sounds like it is revving high. Look at your tachometer. Look at the shift light if your car has one configured. Each gear has an optimal shift point where the car will achieve the fastest acceleration through the next gear. Shifting too early bogs the engine down; shifting too late hits the rev limiter and wastes time. Ask your Crew Chief for the recommended shift points for your current setup, and practice hitting those exact RPM numbers consistently.
6. Going Broke on Repairs
Pushing a low-tier engine past its limits will result in blown parts. A blown engine is incredibly expensive to fix in the early game. If you notice your engine temperatures running dangerously high, or if the Crew Chief warns you that the parts are stressed, do not push for a qualification run. Back off, save the engine, and accept a lower qualifying position. Finishing a race weekend with a functioning car is always more profitable than blowing up in the first round and paying massive repair bills.
7. Over-Adjusting Between Runs
If you make a bad pass, your first instinct might be to go into the garage and change four or five different tuning parameters before the next run. Do not do this. If you change the tire pressure, the clutch, and the fuel mixture all at once, and the next run is better, you will not know which change actually fixed the problem. Change one variable at a time. If the car spun the tires, adjust the clutch. If it still spins, adjust the tire pressure. Keep a mental log of what you changed and what the result was.
Next Steps
Once you have successfully navigated your first few race weekends, secured a steady stream of sponsor income, and consistently managed to not redlight at the starting line, you are ready to take the training wheels off. The early game is about survival and learning the physics; the mid-to-late game is about precision and optimization.
Your immediate next step is to begin mastering manual shifting with precision. Turn off any automatic shift assists and start practicing your shift points relentlessly. In the higher tiers of NHRA, the difference between first and second place is often just a few thousandths of a second, and a single sloppy shift can cost you the race. Use the free practice mode to run the same track dozens of times until your shift points become pure muscle memory.
After that, begin experimenting with advanced tuning concepts. Start reading up on how clutch lock-up timers work in real drag racing, and try to replicate those concepts within the game's tuning menus. Learn how to read the data telemetry from your passes. The game provides detailed graphs showing your engine RPM, wheel speed, and acceleration over the length of the track. A flat spot on the acceleration graph indicates tire spin; a sudden dip indicates a missed shift. Learning to read these graphs is the key to diagnosing problems without relying entirely on your Crew Chief.
Finally, make the transition to online multiplayer. The AI in the game is good, but it cannot replicate the psychological pressure of lining up next to a human opponent who has a perfect .010 reaction time average. Multiplayer in NHRA is structured around brackets, which means you are often racing cars of different performance levels. In a bracket race, a slower car gets a "head start" based on their predicted elapsed time (their dial-in). Your goal is to run exactly as fast as your dial-in predicts, without going faster (known as "breaking out"), while still having a better reaction time than your opponent. This completely changes the strategy from "go as fast as possible" to "go exactly as fast as you said you would." Mastering bracket racing is the ultimate test of a drag racer's skill, and it will provide hundreds of hours of highly competitive gameplay long after you have exhausted the Career Mode.


