Getting Started
Launching Rims Racing for the first time can be an intimidating experience. Unlike arcade racers where you can slam the throttle and drift through corners without consequence, this game demands a methodical approach from the moment you boot it up. Your first few minutes should be spent entirely in the settings menu and calibration screen, not on the track.
Before you touch the asphalt, the game will prompt you to select your starting manufacturer. Unlike typical racing games where you pick a car class, here you are locked into a specific brand's ecosystem early on. Choose carefully based on the type of engine configuration you prefer to learn on. A parallel-twin or a V-twin offers a more forgiving, linear power band, making them excellent for beginners. In-line fours provide a massive power spike in the upper RPM range, which can easily overwhelm new players and cause unwanted wheelies. V4 engines offer a balance of both but come with a steeper learning curve. For your first playthrough, pick a lower-displacement parallel-twin or V-twin motorcycle. It will allow you to focus on learning the physics engine without constantly fighting for rear-wheel traction.
After selecting your manufacturer, you are introduced to your garage. This is your home base for the entirety of the game. Familiarize yourself with the layout immediately. The garage is divided into several key areas: the bike停放stand where you view your machine, the telemetry and suspension workstation, the engine teardown bench, and the track selection monitor. Do not rush to the track. Walk around your garage, interact with the different stations, and understand where everything is located. Being comfortable in this space is crucial because you will spend a significant portion of your playtime here performing maintenance and upgrades.

Core Mechanics
To succeed in Rims Racing, you must understand that it is essentially two distinct games fused into one: a simulator-level motorcycle racing game, and a deep, surprisingly detailed motorcycle mechanics simulator. Neglecting either half will result in failure.
The Riding Physics
The core riding mechanic revolves around tire management and weight distribution. Your front tire handles all the braking and turning forces, while your rear tire handles the acceleration. If you overload either tire, you will crash. When approaching a corner, you must trail-brake—meaning you gradually release the front brake as you lean the bike into the apex. Jamming the brakes while fully leaned over will instantly wash out the front tire. Similarly, rolling on the throttle too aggressively while leaned over will break the rear tire loose. Smoothness is not just recommended; it is mathematically required by the physics engine.
The Mechanical Simulation
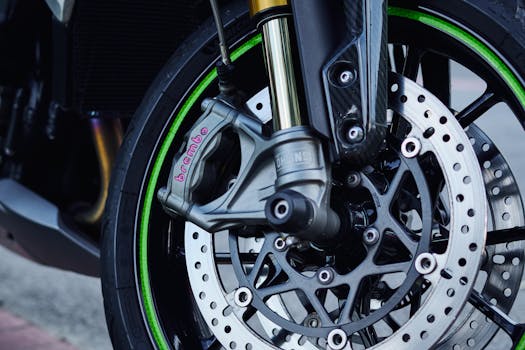
This is what sets Rims Racing apart from MotoGP or Ride. Every single component on your motorcycle has a durability rating, a weight, and a performance metric. Brakes wear down based on heat and usage. Tires degrade based on sliding and improper inflation. Engine oil breaks down over time, reducing power output and increasing internal friction. Gears chip if you miss shifts. You cannot simply ignore your bike between races. If you finish a race with glowing red brakes and shredded rear tires, those components will carry their damaged state into the next event unless you repair or replace them.
The Telemetry System
Learning to read the in-game telemetry is non-negotiable for progression. The telemetry screen shows you exactly what the motorcycle is doing on the track. You can view throttle input, brake pressure, suspension travel, and tire temperatures. If your lap times are inconsistent, the telemetry will tell you why. You might discover you are coasting for a full second before applying the throttle, or that your front suspension is bottoming out under heavy braking, causing the front tire to lose contact with the pavement. Mastering this screen is the difference between guessing at setups and actively engineering a faster motorcycle.

Early Game Tips
The first few hours of Rims Racing are a delicate balancing act between earning money, learning tracks, and keeping your starting bike in one piece. If you mismanage your funds early, you will find yourself stuck in a cycle of debt, unable to afford tires to race.
Protect Your Tires at All Costs
In the early game, tires are your most expensive recurring cost. The temptation to push for the fastest possible lap time on your first few races is strong, but you must resist it. Riding on the absolute limit will destroy your rear tire in a matter of laps, forcing you to buy a new set before you have earned enough prize money to cover the cost. Instead, ride at about 85% capacity. Focus on hitting your braking markers consistently and maintaining a smooth line. You will place lower in the race, but you will keep your tires intact, maximizing your profit margin. A third-place finish with intact tires is infinitely more valuable than a first-place finish with a ruined rear slick.
Learn One Track Intimately
When you unlock the first few events, do not bounce from track to track. Pick the shortest, simplest circuit available and run it repeatedly. The goal here is to memorize every braking marker, every apex, and every throttle application point until you can ride the track with your eyes closed. Why? Because learning a new track while simultaneously fighting the game's strict physics is cognitive overload. By mastering one track, you remove the "where do I brake" variable from your brain, allowing you to focus 100% of your attention on bike control. Once you can comfortably post consistent, tire-preserving laps on one track, you can start expanding your roster.
Master the Basics of Engine Teardown
The game features a minigame where you literally disassemble the engine to upgrade internal components. Early on, the game will force you to change your oil and install basic air filter upgrades. Pay close attention to these tutorials. Do not just click through the prompts. Understand how the engine blocks slot together, how the timing chain aligns, and how to properly torque bolts. Later in the game, you will need to swap camshafts and pistons to remain competitive. If you didn't learn the interface early, you will waste hours fumbling with the mechanic minigame. Furthermore, changing your oil regularly is a free or incredibly cheap way to maintain peak engine horsepower and prevent long-term wear on internal components.
Use the Suspension Presets First
The suspension tuning screen is a nightmare of numbers, graphs, and sliders. Compression damping, rebound damping, preload, spring rates—it is overwhelming. Do not attempt to manually tune your suspension in the first five hours. Instead, rely on the preset options provided by the game. Choose the "Stable" or "Balanced" preset. These presets are specifically designed to give beginners a safe, predictable platform to learn on. You can start tweaking individual clickers later once you can definitively tell the difference between understeer and front-end chatter. For now, a stable setup that forgives your mistakes is worth more than a hyper-optimized track weapon.
Common Mistakes to Avoid
New players tend to fall into the same predictable traps. Recognizing these mistakes before you make them will save you immense frustration and prevent you from restarting your career.
- Ignoring Brake Temperature: Brakes in this game are highly sensitive to thermal limits. If you ride the rear brake into every corner, your rear brake rotor will glow red and lose all stopping power. Use the rear brake sparingly, primarily to settle the chassis mid-corner, and rely on the front brake for the vast majority of your stopping force. If your brakes start smoking, back off and let them cool, or you will suffer brake failure.
- Upgrading Horsepower Before Grip: It is incredibly tempting to blow your first big paycheck on a full exhaust system and an ECU tune. Do not do this. Adding 20 horsepower to a bike that is already sliding around on worn tires is a recipe for disaster. Your very first upgrades should always be grip-related: high-quality racing slicks and steel braided brake lines. A slower bike with massive grip will always beat a fast bike with no traction. Power is useless if you cannot put it to the ground.
- Mismanaging Tire Pressures: You cannot simply set your tire pressures to the maximum recommended PSI and forget about them. Tire pressure fluctuates drastically as the tires heat up. If you set cold pressures too high, the tires will overinflate during the race, creating a tiny contact patch and causing the bike to skate across the track. Check your telemetry after a few warm-up laps to see where your hot pressures settle, and adjust your cold pressures accordingly to hit the optimal hot target.
- Slamming the Throttle on Exits: Arcade racers teach you to mash the throttle the second the apex is behind you. In Rims Racing, this will high-side you into the stratosphere. You must gradually roll on the throttle, matching the rate of acceleration to the rate at which you are standing the bike up. As the bike becomes more upright, you can apply more throttle. Think of the throttle as a dial, not an on/off switch.
- Skipping the Calibration Tool: The game features a specific calibration tool for your controller or steering wheel. If you skip this, your throttle and brake inputs may be non-linear, meaning a slight press of the trigger could result in 100% brake lockup. Take the five minutes to calibrate your inputs so that the in-game resistance perfectly matches your physical hardware.
- Forgetting to Save Setup Configurations: There is nothing worse than spending an hour perfecting a gear ratio and suspension setup for a specific track, only to accidentally overwrite it when testing a new part. The moment you create a setup that works, save it to a specific slot named after the track. This allows you to instantly load your optimal setup when you return to that circuit later in the career.

Essential Controls & Settings
Getting your control settings right is the foundation of a good experience in Rims Racing. The default settings are notoriously unforgiving, often set up with simulation-level sensitivity that punishes standard controllers.
Controller Deadzones
By default, the steering deadzone is usually set too low. This means the slight drift inherent in analog sticks will cause your rider to constantly make micro-corrections, leading to rider fatigue and unexpected leans. Go into the control settings and increase your steering deadzone by about 5% to 10%. This creates a small "dead" area in the center of the stick, ensuring the bike runs perfectly straight when you aren't actively pushing the stick. Do the same for the throttle and brake triggers to prevent accidental inputs.
Assist Levels
Assists are not a sign of weakness; they are training wheels. For your first several hours, you should run with the following assist configuration:
- Braking Assist: Low. This prevents you from locking the front tire under heavy braking, which is the most common cause of early crashes. It does not brake for you; it simply modulates the pressure to keep the tire at the edge of locking.
- Traction Control: Medium. This keeps the rear wheel from spinning wildly when you make a throttle mistake. It allows for slight slides but prevents catastrophic high-sides.
- Anti-Wheelie: High. Wheelies look cool, but they slow you down and unpredictably alter your braking geometry. Turn this on high until you are comfortable managing your right wrist.
- Riding Aid (Auto-lean): Off. This is the one assist you should turn off immediately. Auto-lean takes cornering control away from you, making it impossible to learn proper geometry and trail-braking. Force yourself to learn manual leaning from day one.
Camera Views
The camera you choose drastically alters your perception of speed and bike lean. The default third-person chase camera is popular, but it makes judging corner apexes very difficult because the camera is positioned behind the rider. Switch to the Helmet Cam or a Low Nose Cam. These views place your viewpoint exactly where the rider's head would be. While disorienting at first, they provide the most accurate representation of track position and lean angle. If you absolutely cannot handle the first-person view, use the closest possible zoomed-in third-person camera.
Progression System
Understanding how Rims Racing gates its content will prevent you from hitting progression walls. The game does not use a traditional XP system where you level up a single profile. Instead, progression is tied directly to manufacturer reputation, currency, and component unlocks.
Manufacturer Reputation
Every race you finish contributes to your reputation with the manufacturer of the bike you are riding. This reputation is split into tiers. To unlock the next tier of performance parts—such as racing ECU units, lightweight wheels, or full race kits—you must reach a specific reputation threshold with that brand. This means you cannot just buy a Yamaha, race once, and switch to a Ducati. If you want the best Ducati parts, you must commit to racing Ducatis for a significant portion of the career. Pick a manufacturer you genuinely like early on and stick with them to maximize your unlock rate.
The Currency Economy
You earn credits through race placements, completing optional objectives in races, and fulfilling sponsor contracts. The economy is surprisingly tight in the early game. You will often find that winning a race barely covers the cost of the tires you burned through to win it. To build a financial cushion, you must engage with the contract system. Contracts are optional challenges tied to specific races, such as "Finish the race without crashing" or "Complete 5 clean overtakes." Fulfilling these contracts usually provides a massive cash bonus on top of your race winnings. Always check the available contracts before starting an event and tailor your race strategy to fulfill them.
Component Unlocks and the Workshop
As your reputation increases, new parts appear in your garage workshop. However, unlocking a part and installing it are two different things. High-end components, like forged pistons or race-spec camshafts, require you to physically disassemble the engine using the mechanic minigame. Furthermore, these parts often have specific tuning requirements. Installing a high-lift camshaft might require you to adjust your fuel mapping or raise your rev limiter to actually see the benefits. Progression in Rims Racing is not just about buying the best part; it is about understanding how that part interacts with the rest of the motorcycle. A top-tier exhaust paired with a stock air filter and restrictive intake will actually lose power compared to a balanced mid-tier setup. Always upgrade in complementary pairs.
Resources & Where to Find Help
Because Rims Racing occupies a strange niche between hardcore simulation and mechanic puzzle game, traditional racing game communities sometimes lack the specific technical knowledge required to help you. Here is exactly where you should look when you get stuck.
Official and Community Discords
The official RaceWard Studio Discord is the absolute best place for troubleshooting. Because the game features highly specific mechanical systems, bugs can occasionally occur—such as a suspension upgrade not applying its stats correctly, or an engine teardown minigame glitching out. The developers are active in these channels, and posting a screenshot of your telemetry or your upgrade screen will usually yield a direct response. Additionally, the community has created dedicated channels for specific manufacturer builds, where veteran players share their exact suspension clicker settings and gear ratios for specific tracks.
Telemetry Sharing Sites
If you are struggling with lap times, the community-run telemetry sharing boards are invaluable. Players export their clean lap telemetry data and upload it. You can overlay your telemetry data directly on top of a top-ranked player's data. You will instantly see exactly where you are losing time. You might notice that the pro player is braking 10 meters later than you, or that they are applying throttle 2 seconds earlier on corner exit. Mimicking their inputs is the fastest way to improve your riding technique without grinding for hours.
Video Tutorial Channels
For visual learners, YouTube channels dedicated to sim racing are crucial. Search specifically for "Rims Racing Engine Building Guide" and "Rims Racing Beginner Setup." Do not just watch general motorcycle racing tutorials; Rims Racing has unique physics quirks that standard MotoGP videos won't cover. Look for creators who focus specifically on the mechanic aspect of the game. Watching someone else perfectly execute a timing chain replacement or a valve clearance adjustment will save you from ruining expensive in-game engines through trial and error.
In-Game Manuals and Part Descriptions
Never skip the informational tooltips in the upgrade menu. The game actually provides incredibly detailed, mechanically accurate descriptions of what each part does. A description for a steering damper, for example, will explain exactly how it affects high-speed tank slappers and low-speed turning resistance. Reading these descriptions is essentially a free course in motorcycle engineering. When you are unsure of what to upgrade next, read the descriptions of the available parts. The game will often subtly hint at the weak link in your current setup through these tooltips, guiding you toward the most efficient upgrade path without you having to guess.